CPSC 550 Project
By J. Ryan Woo
and Mark Leonard
(Originally written April 2010)
Background
Both servers and networks experience problems with configuration and ongoing operation. It is the role of the network and system administration team to be able to determine the nature of these problems and resolve them as quickly as possible. To this end, many organizations have deployed “management networks” that allow operators to manage their servers and network infrastructure without the need for physical access to the equipment. In some cases, access to these management networks is provided through a VPN service over the Internet. This begs the question – what does an administrator do if the problem interferes with connectivity to the management network? Is the only option available to fall back to physical access to the infrastructure? If your network connection is offline, how can you receive alerts about a problem?
The first goal of this project is to evaluate a couple different methods of accessing a management network without needing physical access. The second goal was to establish a method of delivering Nagios alerts in the event that upstream network connectivity is offline. It should be stated that on neither of these fronts is this document to be considered complete, authoritative, nor exhaustive. There are no doubt many other methods of doing both of the above without using the methods described herein.
Part 1: POTS Dial-in with PPP
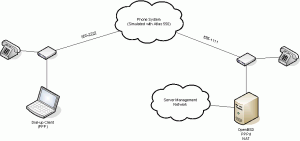
The first method we came up with for remote access to the management network was via a dial-in system. In this situation we chose OpenBSD and PPP for the server. With this configuration, the OS in use on the client machine becomes irrelevlant – everything supports PPP. This is the rough network diagram we came up with and then built:
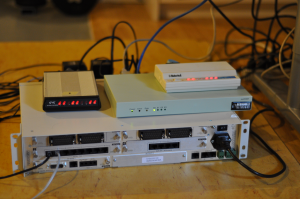
The Adtran Atlas 550 is a WAN simulator capable of simulating phone systems and other types of networks. It took a bit of time to figure out how to log into the serial console of the Atlas 550 and setup the ports with phone numbers and a minimalistic dial-plan.
In Mark’s pile of old computer parts, we were able to find a GVC 33.6kbps voice/faxmodem and a US Robotics 56kbps faxmodem. The US Robotics modem was connected to the OpenBSD machine as US Robotics’ “AT” command set has better support.
For the OpenBSD machine we used a Soekris Engineering Net5501 with an additional serial port installed. The OS was installed via PXE-boot onto a 4GB compact flash drive.
The version of GETTY that ships with OpenBSD is ill-suited for use with PPP. Ryan was able to track down an alternative package called MGETTY which had native support for PPP. With that installed, the modem had to be adjusted to ensure it did not answer automatically and not suppress normal “AT” response codes. This was accomplished by adjusting the DIP-switches on the back of the modem as follows:
- disable auto-answer
- don’t suppress result codes
- disable echo for local commands
MGETTY would wait for informational responses from the modem such as “RING” and “CONNECT” and choose the next course of action based on those responses.
Required changes to OpenBSD:
/etc/pf.conf:
...
nat on vr0 from 10.0.0.0/24 to any -> (vr0)
...
/etc/hostname.vr0:
dhcp
/etc/sysctl.conf:
...
net.inet.ip.forwarding=1
...
/etc/mgetty+sendfax/login.config:
...
/AutoPPP/ - - /etc/ppp/ppp-dialup
...
/etc/mgetty+sendfax/mgetty.config:
debug 4
fax-id 49 115 xxxxxxxx
speed 38400
port cua01
data-only yes
modem-type data
/etc/ppp/ppp-dialup:
#!/bin/sh
exec /usr/sbin/ppp -nat -direct pap$IDENT
/etc/ppp/ppp.conf:
default:
set device /dev/cua01
enable proxy
enable passwdauth
nat enable yes
accept dns
set dns 8.8.8.8
set ifaddr 10.0.0.5 10.0.0.6 255.255.255.255
add default 10.0.0.5

pap:
enable pap
enable proxy
enable passwdauth
nat enable yes
accept dns
set dns 8.8.8.8
set ifaddr 10.0.0.1 10.0.0.2 255.255.255.255
add default 10.0.0.1

chap:
enable chap
enable proxy
enable passwdauth
nat enable yes
set dns 8.8.8.8
set ifaddr 10.0.0.3 10.0.0.4 255.255.255.255
add default 10.0.0.3
enable proxy
enable passwdauth
/etc/ttys:
...
cua01   "/usr/local/libexec/mgetty -x 9"    dialup  on
...
Config sent (and saved) to the US Robotics modem:
ATZ
AT&C1&D2&H1&I0&R2&W
PPPd uses any username and password from the /etc/passwd file.
Problems we encountered:
- 8 pin serial cable – failure to properly detect the carrier status
- Vista (for some reason after an unsuccessful dial-up attempt, the serial port would become non-responsive).
Part 2: Wireless Modem VPN
The biggest problem we could see with Part 1 above is the truck scenario:
A truck hits a telephone pole near your datacenter. In the process both your primary internet connection and your analog telephone line are knocked out. As a good system administrator you have provisioned a secondary upstream link, but some configuration is required to bring it online.
(This nicely contrasts the difference between a truck and a series of tubes.)
We were able to acquire a MultiTech Systems MultiModem GPRS Wireless Modem, model number MTCBA-G-F4 to use for this segment of the project. A serviced SIM card was also obtained.
The biggest problems we encountered was the lack of clear documentation – Appendix A (not included in the online version) illustrates this problem quite nicely – people we talked to about what we were trying to do had never heard of this before, and even if they had some idea about what we were trying to do, they would provide us with misleading or wrong information.
Part 2: Method 1: Circuit Switched Data
The Cellular Modem was purchased with this plan in mind – use it as if it were just another POTS modem. Connect it to a serial port, and use it for point-to-point connections to a POTS modem or a second cellular modem. This failed spectacularly.
When a cellular device initiates a call it needs to reserve a certain amount of channel space on the cellular network for the connection. With a POTS modem there is always a carrier signal bidirectionally between the two modems to maintain the connection and to enable detection for carrier loss.
Conversely, modern cellular phones only transmit or receive data when there is sufficient input to warrant actually sending a packet. In other words, if neither party on a conversation is actually talking, the throughput is almost zero. Secondly, each packet of data may use a different circuit or carrier frequency if there is congestion on another. This hopping between circuits allows the tower to be oversubscribed with fewer problems.
For a cellular modem to be able to connect to a POTS modem, it would need to negotiate a static circuit and be passing data non-stop. The cellular providers all discourage this practice. This is referred to as a Circuit Switched Data (CSD) connection. We soon found out that the provider we were using silently stopped allowing CSD connections sometime prior to 2005. There is no documentation about this change on the provider’s website. We were only able to come to this conclusion based on it not working, and rumors we saw on various Internet message boards.
Part 2: Method 2: GPRS/GSM PPP connection
After realizing that CSD would not work, we found ourselves flipping through the manual looking for alternatives. PPP was mentioned in several places so we decided to investigate further. We were already convinced that there must exist some method for us to use the cellular modem for data connectivity.
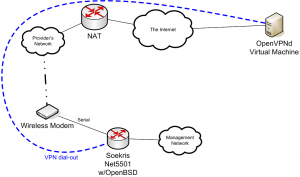
The cellular provider we used didn’t assign public IP addresses to client devices. To overcome this limitation, and to allow ourselves access back into our own infrastructure we had to redesign the network. The layout that follows isn’t ideal, but it does provide a secondary connection back into the management network during times of need:
This relies on having a server (in our case a virtual machine) hosted someplace else on the Internet that we can access in times of need. Here’s the sequence of events for using this secondary link:
- The Soekris/OpenBSD machine must be able to detect that there is need for this alternate connection
- The Soekris/OpenBSD machine must initiate a PPP dial-out connection to the wireless provider’s network.
- Upon successful connection to the wireless provider, the Soekris/OpenBSD machine must connect to the OpenVPN server (at a pre-determined location) as an OpenVPN client
- An administrator should be able to SSH or VPN into the OpenVPN server, and then connect to the Soekris machine and thus the management network.
It took us much longer than expected to establish a PPP connection with our wireless provider. As a result, we were unable to actually implement network-fault detection and automatic dial-out. OpenVPN configuration was also ignored. Had we sufficient time, it is likely that we would have either used OpenBSD’s built-in “ifstated” or Nagios to detect problems and initiate the dial-out. Another idea that was tossed around was waiting for a specially crafted SMS message to initiate dial-out.
To initiate a PPP data connection, the modem only requires data connectivity. There is no requirement for voice nor for SMS messaging. Unfortunately, data connectivity in Canada is reasonably expensive.
Prior to actually setting up any of this system, we had to do some testing. First we figured out how the modem dealt with incoming SMS messages. We were unsure how an incomming message would disrupt a PPP connection, but it’s probably better to just avoid the situation entirely. Text in green represents data or messages sent to the terminal equipment from the modem. We found a command in the AT command reference for the modem to test that the modem would actually receive and display SMS messages:
AT+CNMI=2,2,0,0,0
OK
Sample received SMS message:
+CMGR: "REC UNREAD","+14036697317",,"10/04/02,15:03:22-08"
Goats
In the above example, the phone number identifies the sender. The “Goats” was the content of the message sent. Messages were received on the modem within seconds of being sent from a nearby SMS-capable phone. With that established, we had to make sure we could disable any SMS messages on the modem. Again, the AT command reference pointed us in the right direction:
AT+CNMI=2,0,0,0,0
OK
From that point on, there was no indication that the modem had received any SMS messages.
With SMS quieted, we felt it was a good time to try to initiate a PPP connection to the provider’s wireless network:
ATD*99***1#
CONNECT 38400
Interestingly, there is only a split-second delay between submitting the ATD command and having the “CONNECT” response. This is likely a benefit of running a modem on a digital network.
It’s important to discuss this AT command. Just like in the old POTS modem days, the “D” in “ATD” means “dial”. Unlike the old POTS days, we don’t need to specify “T” for tone dialing. GSM and GPRS are digital technologies, so ATD is sufficient.
As far as the actual number is concerned – it’s not a typical phone number. In fact, the “*” character seems to be reserved for GSM information, as is the “#”. From the documentation that comes with the modem we have been able to piece together a bit more information on this subject. The first “*99” indicates a “Request GPRS IP Service D” meaning data service via PPP connection. The “***1” specifies a “particular Packet Data Protocol (PDP) context”. The “#” likely represents the end of the code. Most of the examples, in addition to what we were told by the cellular provider’s technical support staff indicated that the appropriate number is “*99#”. Although that may work on some devices, it isn’t universal. Many hours were spent trying to determine why “*99#” would connect, authenticate (via PPP) and then promptly disconnect. In desparation, we tried the “*99***1#” that was mentioned in a couple locations in the modem’s manual. We had avoided this number because the manual refered to standards in place in the United States, and not necessarily Canada.
In the end, we generated a new /etc/ppp/ppp.conf:
default:
disable ipv6
set log Phase Chat LCP IPCP CCP tun command
set device /dev/cua01
set speed 38400
set dial "ABORT BUSY ABORT NO\\sCARRIER TIMEOUT 5 \"\" AT OK-AT-OK ATE1Q0 OK \\dATDT\\T TIMEOUT 40 CONNECT"

modem:
set phone "*99***1#"
set ifaddr 10.0.0.1/0 10.0.0.2/0 255.255.255.0 0.0.0.0
add default HISADDR
enable dns
disable ipv6
No username, nor password, nor access point name (APN) was required for the connection. All of the documentation we encountered indicated that all three of these parameters were required.
The connection was initiated with the command:
# ppp -auto modem
Working in auto mode
Using interface: tun0
During the connection process, the PPP daemon will create a default route only if there is no existing default route. This must be taken into account for any future work on this project. There is also a “tunnel” network interface that is created and configured during the PPP negotiations:
# ifconfig tun0
tun0: flags=8051<UP,POINTOPOINT,RUNNING,MULTICAST> mtu 1500
priority: 0
groups: tun
media: Ethernet autoselect
status: active
inet 10.179.236.130 --> 192.168.111.111 netmask 0xffffff00
The routing table is also modified:
# route -n show -inet
Routing tables

Internet:
Destination        Gateway            Flags   Refs      Use   Mtu  Prio Iface
default            192.168.111.111    UGS        0        4     -     8 tun0
127/8              127.0.0.1          UGRS       0        0 33200     8 lo0
127.0.0.1          127.0.0.1          UH         2        0 33200     4 lo0
192.168.111.111    172.28.15.58       UH         1        0  1500     4 tun0
224/4              127.0.0.1          URS        0        0 33200     8 lo0
Notice the RFC1918 (Private) IP address that is assigned during the PPP negotiation. We were unable to find any method of obtaining a public IP address. This does limit some options and applications of this modem. It could be interesting to use a pair of these in a future project to attempt to establish a point-to-point connection between two sites.
Part 3: Nagios alerts direct to SMS
For this segment we again used the MultiTech GPRS Wireless Modem. This was one of the few wireless modems available that used GPRS and GSM with an RS-232 interface for both data and control. This modem uses the traditional Hayes “AT” commands, with many additional parameters to setup and control wireless connectivity.
The goal was to determine if it was possible to use the wireless modem to send SMS text messages directly to the phones of system administrators via Nagios. Yes – is the short answer, and the long answer isn’t that long.
Nagios allows plugins to be used for just about everything. These plugins are passed information like the contact’s cell phone number and the message to send. Although it would be fairly easy to make a plugin talk to a serial port and deal with the AT commands in order to send an SMS message, we ran out of time to actually write such a script. As proof of concept, we were able to use a terminal program (in this case “minicom”) to send out SMS messages.
Text in green represents data or messages sent to the terminal equipment from the modem.
Send an SMS message. It should be noted that <ctrl-z> is character 0x1A in ASCII.
AT+CMGS="+14036697317"
> <text of message><ctrl-z>
OK
In the example above, the phone number is that of the recipient.
The modem only requires a phone number (to originate the messages) and SMS messaging service. There is no requirement for either data connectivity nor for voice connectivity. As a result, this would be fairly inexpensive to operate in production.
Conclusions
We were successful in creating a “proof of concept” for a couple different methods of secondary connectivity. Certainly more work would be required in order to implement any of these methods in a production environment.
The PPP stack continues to exist in production today, but we feel that it has become a bit of an anachronism. It is barely mentioned in modern documentation. Traditional analog modems which were once quite common have now been replaced by DSL and Cable modems which are much faster, but rely on both existing infrastructure and a service provider that is interested in mass-market solutions rather than unique and flexible solutions. We fear that it may get to the point where no usable documentation exists for some of these very flexible technologies.
For Internet-free notifications, a simple serial-connected wireless modem is quite effective.


